Professor Layton vs Ace Attorney - any%, US Route
Timing starts on pressing OK at name input screen.
Cutscenes can be skipped by pressing start, then confirming skip when prompted
Timing ends at the fade out of the dialogue box “the last witch trial has drawn to a close.”
Some text in the run cannot be fast mashed thru.
Movement requires two taps on desired movement location (unlike MM and AL, which only need one)
Answer NO when prompted to save
It is advised to practice puzzles before a full run, as they are more complex in terms of input that most other Layton games. Puzzles can be practiced from Puzzle Index in a previous save file.
How To Read
Investigation sections
- Move: Use movement menu (styled as 3D Layton games).
- Chat: Mash A/R and touch screen to get past.
- Cutscene: Skip unless stated otherwise.
- Puzzle: Follow specific solution, stated after puzzle number. Puzzles may include notes for further clarification.
Trial Sections
- Present X, Y: Present evidence X at statement Y.
- Present X: Present evidence X (auto prompted menu)
- Grimoire X, Y: Present spell X of Grimoire at statement Y
- Grimoire X Present spell X of Grimoire (auto prompted menu)
- Press X: Press statement X.
- Press New: Press newly added statement.
- Press ALL: Press all statements in testimony.
- Question X: Question witness X at current statement
- Ignore X: DO NOT Question witness even if they get a prompt to do so
Trial Controls
- D-Pad: move thru statements/options in questions/menus
- R: Present menu
- R (on Present Menu): Switch to Evidence/Profiles
- X (on Present Menu): Present Evidence
- L: Press Statement
Prologue: On a Dark and Stormy Night
Cutscene
Chat
Cutscene
Examine bookshelf
Puzzle 01

Talk to Espella
Chat
Cutscene
Chat
Cutscene
Chat
Talk to Chelmey
Move down
Examine car
Puzzle 03
Note: this puzzle can be solved using the D-Pad
x3
x2
x5
x2
x2
x5
Zoom in on statue
Chat
Move up
Chat
Move right
Chat
Enter Tunnel (Movement menu)
Chat
Zoom in on symbol on wall
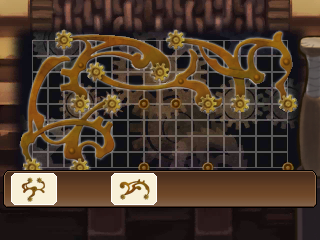
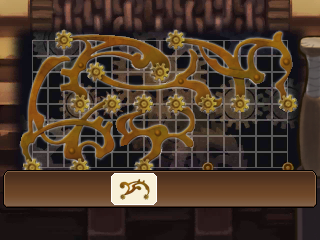
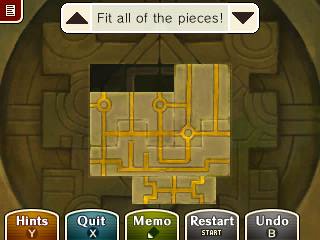
Puzzle 04
Notes:
- This puzzle can be solved using the D-Pad, and it is recommended to do so
- Move hand to position with D-Pad, and grab/release pieces with A
- Pieces will automatically drop to the first valid position they can be at, so follow instructions precisely and don’t release pieces unless stated otherwise
- Movement instructions are given in amounts of tiles
Reverse L piece (middle left):
1 , 4
S Piece (bottom right):
4 , 4
1x1 piece (middle):
2 , 5
2x2 square (top right):
4 , 1
T piece (top right):
3 , 6
L piece (bottom left):
1 , release
Z piece (top left):
5
L piece:
2 , 5
Chat
Cutscene
Chat
Examine Espella’s leg (bottom of screen)
Puzzle 05: Click B
Note: Answer button must be clicked twice
Chat
Cutscene
Chat
Cutscene
Save Prompt
Cutscene
Prologue: English Turnabout
Chat
Cutscene
Chat
Answer Espella (Middle)
Answer Theft and Assault (Bottom)
Answer No need (bottom)
Cross Examination: Patrolling on the Night of the Crime
Press 1 (“That night”)
Present Crime Scene Photo, 5 (“Within seconds”)
Cross Examination: What I Sat at the Crime Scene
Present Medical Report, 4 (“That girl”)
Answer Plead not guilty (Top)
Answer Continue Trial (Top)
Save Prompt
Cross Examination: When I found the Girl
Present Fingerprint Photo, 4 (“She’s short”)
Answer Position of fingerprints (Middle)
Answer Prove there’s a contradiction (Top)
Present Medical Report
Answer Tried to defend herself (Bottom)
Answer It’s impossible (Bottom)
Present Torch
Cross Examination: About PC Badger
Present Torn Tag, 1 (“I wrestled this toy”)
Answer The toy was swapped (Middle)
Answer It’s impossible (Bottom)
Answer Request search (bottom)
Present Newspaper
Not Guilty!
Chat
Cutscene
Save Prompt
Chapter 1: Mysterious Labyrinthia
Chat
Talk to hooded passenger
Talk to wagon driver
Cutscene
Chat
Talk to Knights
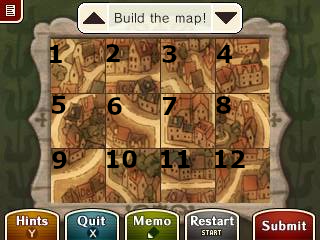
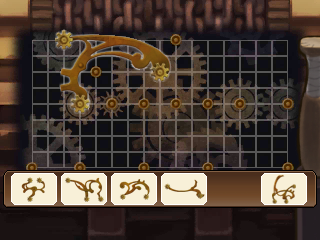
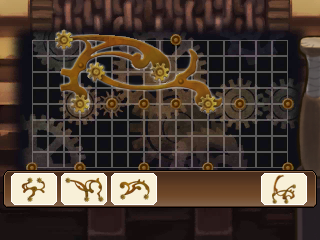
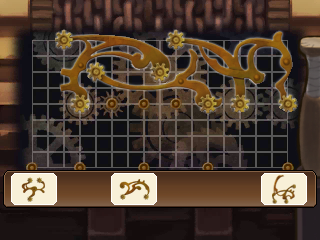
Puzzle 06
Note: instructions show how to swap images at every slot. Slots are numbered, images are not.
1 -> 5 -> 6 -> 7
8 -> 3 -> 2

Chat
Talk to Cecil & Petal
Puzzle 07
Yellow
Red
Yellow
Red
Blue
Red
Move up
Talk to Bardly
Puzzle 08
10 > 6 > 5 > 2 > 4
3 >7 > 8 > 11 > 9

Move left
Talk to Knights
Puzzle 10: Answer B
Move right (twice)
Talk to Petter
Puzzle 09

Note: Solution may be input in any desired order
Move north
Chat
Cutscene
Chat
Move to East Av. (down, right, up, right)
Enter Bakery
Talk to Maya
Puzzle 13

Talk to Espella
Notes:
- Complete dialogue to Espella in any desired order, as long as you unlock all dialogue options.
Move out and north
Move north to Archives
Enter Archives
Chat
Talk to Ridelle
Puzzle 16
Notes:
- This puzzle can solved using the D-Pad
x3
x2
x2
x2
Puzzle 17
x3
x2
Move up
Examine book
Zoom in on emblem
Puzzle 19


Enter cellar
Talk to Ridelle
Cutscene
Move to E. Shopping Area
Talk to Petter
Enter bakery
Chat
Save Prompt
Cutscene
Chapter 2: The Fire Witch
Trial
Chat
Cutscene
Chat
Cutscene
Chat
Cross Examination: What we Saw Tonight
Press 1 (“The delicious scent”)
Present Lantern, 4 (“There was not a trace”)
Chat
Answer Point out contradiction (top)
Examine Espella’s right hand
Cross Examination: About the Talea Magica
Present Lantern, 4 ("The witch was holding")
Cross Examination: About the Talea Magica (cont.)
Press 3 (“The milk bucket is lighter”)
Present Bucket of Milk, 5 (“The girl was not holding”)
Cross Examination: About the Sequence of events
Press 1 (“Of course!”)
Skip to end
Press 1 (“Of course!”)
Question 2
Chat
Save Prompt
Cross Examination: The Mystery of the Witch’s Sceptre
Present Bucket of Milk, 5 (“That’s easy”)
Press NEW ("That witch was there holdin’ ")
Question 1
Answer One of them is the witch (bottom)
Examine between Espella and rogues
Grimoire 2 (Dimere)
Cross Examination: What We Saw and What We Didn’t See
Press 5 (“As I said…”)
Question 3
Answer Question further (Top)
Press NEW
Answer Contrains a clear contradiction (Bottom)
Testimony 2
Present Area Map
Grimoire Dimere
Answer To cover up her crime (bottom)
Present Glasses
Answer she couldn’t fint her glasses (Middle)
Present Bucket of Milk
Cutscene
Chat
Save Prompt
Chapter 3: The Great Witch
Chat
Move left
Talk to Darklaw
Move to E. Shopping Area
Enter Bakery
Move to W. Shopping Area
Talk to Price
Puzzle 26
Mice numbered from left to right, 1 to 8:
Left: 1, 3, 5, 6
Right: 2, 4, 7, 8
Move south
Talk to Bardly
Puzzle 27

Move south
Talk to Knights
Puzzle 28
Notes: Start the line from the S mark.

Move to plaza (up, west, left)
Talk to Darklaw
Go to bakery
Move right (twice)
Move right
Talk to Espella
Move right
Talk to Knights
Puzzle 32

Move right
Talk to Cutter
Puzzle 33

Move right
Examine door
Puzzle 36
Buttons numbered from top to bottom, 1 to 5:
5, 2, 2, 3
Cutscene
Chat
Talk to Espella
Cutscene
Move left
Talk to Barnham
Leave court
Move to Plaza (right x2, right x3)
Move left
Talk to Jean
Talk to Jean
Cutscene
Chat
Chat
Move up
Examine left border of painting
Examine white stain on floor
Talk to Jean
Examine goat statue
Examine well
Examine desk
Cutscene
Chat
Cutscene
Save Prompt
Chapter 4: The Golden Court
Trial
Cross Examination: What We Witnessed
Press 2 (“Mayhap something…”)
Question Luke
Answer Ask Espella to speak out (Top)
Present Floor Plan, 4 (“The Professor must…”)
Cross Examination: A Shadow at the Crime Scene
Press 2 (“Same place, same magic trick…”)
Press NEW (“That hat maker was pointing…”)
Question Luke
Question Emeer
Answer Where was it lying? (Bottom)
Answer Actually, there is a problem (bottom)
Magnify Talea Magica
Cross Examination: The Golden Statue and the Spectre
Press 3 (“Bewitched by love…”)
Ignore Emeer
Question Luke
Answer Let’s hear Cracker’s testimony! (top)
Answer Cross-examine Cracker (top)
Grimoire Goldor, 5 (“Godoor!”)
Answer Naturally, I have proof (Top)
Present Behind the Painting
Answer Something else (Bottom)
Present Talea Magica
Magnify Purple Gem
Present Jean Greyerl
Save Prompt
Answer in Greyerl’s possession (Bottom)
Magnify Greyerl’s collar
Answer Ask about another case (Bottom)
Cross Examination: The Night of the Crime
Press 3 (“A neighbor had come…”)
Present Talea Magica, NEW (“It dawned on me”)
Present Crime Scene Sketches
Cross Examination: After Discovering the Body
Press 3 (“Whaddid I do then…”)
Question Greyerl
Present Blank Letter, NEW (“Sir Belduke said…”)
Cross Examination: Sir Belduke’s Letter
Press 3 ("I left his study")
Question Greyerl
Press NEW (“Miss Mailer left…”)
Question Emeer
Present Tomato Juice Bottle, 5 (“Then that guy went…”)
Cross Examination: The Alchemist and His Butler
Press 2 (“That’s why I could never…”)
Answer Suggest another motive (Middle)
Present Blank Letter
Press NEW (“I had no reason…”)
Ignore Mailer
Answer there’s a contradiction (Bottom)
Answer I can’t present evidence (Bottom)
Present Testimony 3
Answer Investigate contradictions (Bottom)
Present Crime Scene Sketches
Answer Emeer (Bottom)
Magnify Bottle
Answer Himself (Middle)
Present Blank Letter
Cutscene
Save Prompt
Chapter 5: A Taste of Despair
Chat
Move down
Move down
Enter Tavern
Talk to Rouge
Move up
Talk to Rouge
Puzzle 42

Move up
Chat
Move down
Move left
Talk to Mary
Talk to Knightle
Cutscene
Talk to Mary
Examine bell under wheel
Cutscene
Move right
Enter Tavern
Talk to Rouge
Move to Courtroom Entrance
Puzzle 48

Chat
Move up
Examine lever
Puzzle 49

Puzzle 50


Cutscene
Puzzle 51
Notes:
- Move characters with D-Pad
- Switch control between characters with the A button
Switch to Layton
x2
x2
Switch to Maya
x4
x2
x5
Switch to Layton
(auto switch to Maya)
Move left
Chat
Move up right
Talk to both Shades
Move left
Talk to Shade
Move left
Talk to Shade
Puzzle 53
Notes:
- Move with the D-Pad. Hold the button to move long distances.
- Press A to hammer and knock a nearby log
- A red shadow will indicate in which direction the knocked log will fall off.
- Practice the puzzle before runs!


Move left
Enter Mansion
Talk to both Shades stirring pots (top section of screen)
Talk to new Shade (bottom middle)
Puzzle 54
Cups numbered from left to right, 1 to 4:
1 > 3
2 > 4
4 > 1
3 > 4
3 > 2
2 > 1
Talk to Shades (middle)
Move up
Talk to Shade
Puzzle 55
B > E
D > C > A
Examine throne
Examine stain on back wall
Save Prompt
Chapter 6: Secrets of the Underground Ruins
Cutscene
Examine background door
Move right
Chat
Talk to Shade
Enter Mansion
Move up
Move up
Chat
Examine background door
Puzzle 57
Try Inserting key
Rotate key 180°
Try inserting key
Try inserting key head
HOLD IT!
Click C, OBJECTION!


Examine stone with symbols (left)
Examine river
Puzzle 59
Notes:
- Boxes can be stacked in any order, regardless of size

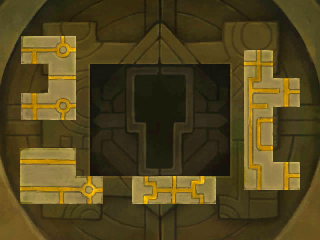
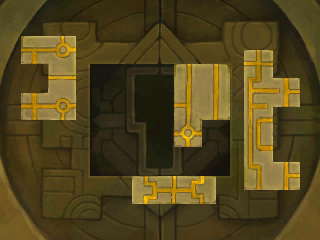
Puzzle 60
Buttons numbered from left to right, 1 to 5:
Slide 2 up
Slide 3 down
Slide 4 up
Slide 5 down
Puzzle 61
Tiles numbered from left to right, from 1 to 4
Place tile 1 in left hole
Rotate tile 4 a quarter turn counter-clockwise
Place tile 4 right
Press Check
Examine Altar
Cutscene
Chat
Save Prompt
Chapter 7: The Story’s End
Cutscene
Talk to Cecil & Petal
Talk to Tuggit
Cutscene
Chat
Move up
Examine floor plan on the floor (middle right)
Examine robe
Examine shiny pendant
Examine panel on left column
Save Prompt
Move to the right
Chat
Examine tower
Puzzle 63

Save Prompt
Chapter 8: The Final Witch Trial
Trial
Chat
Cutscene
Cross Examination: About the Incident
Press 1 (“I finally realized”)
Present Vigilantes’ Report, 2 (“Once evening fell…”)
Press 3 (“I waited for my father’s…”)
Press 4 (“I… I don’t know why…”)
Press 1 (“I finally realized”)
Question Eve (“Yes… I’d always had a feeling…”) (Note: there’s no cue for this question)
Present Footprints Sketch, NEW (“My cat”)
Cross Examination: Guarding the Bell Tower
Press 9 (“Ah didne rin awa’ …”)
Question 1
Question 5
Press 4 (“But then. suddenly…”)
Press 7 (“Rain is so loathsome”)
Present Footprints Sketch, NEW (“When I saw those muddy…”)
Answer Both are correct (Bottom)
Present Flour Covered Robe
Cross Examination: The Time of the Crime
Present Bell Tower Plan, 7 (“We captured the girl…”)
Magnify Belfry (Bell, all the way to the top, scroll up)
Press 8 (“There was no other witch”)
Question 10 (“And we heard no incantations…”)
Present Contraption, NEW (“I recall”)
Present Pendant
Puzzle 64
Note:
- Puzzle automatically stops after solution, without correct prompt.
Rotate top left gear a quater turn clockwise
Rotate bottom right gear a quarter turn clockwise
Chat
Answer Raise an objection (Bottom)
Answer in Espella’s person (Bottom)
Magnify Espella’s bracelet
Puzzle 64
Rotate top left gear a quater turn clockwise
Rotate middle right gear a quater turn counter-clockwise
Rotate middle gear a quarter turn clockwise
Chat
Save Prompt
Layton
Examine lift
Puzzle 65


Puzzle 66
Puzzle 67


Cutscene
Examine building on the left
Move up
Zoom in on curtain
Examine door
Move up the stairs
Examine pictures in wall
Examine piano
Puzzle 68
1 > 2
2 > 4
2 > 5
2 > 7
Cutscene
Puzzle 69
Notes:
- Failing this puzzle first try randomizes the answer for next attempt.


Cutscene
Save Prompt
Chapter 9: The Last Inquisition
Trial
Cross Examination: My Role and Identity
Press 4 (“I… was only there to…”)
Press 3 (“As it rained…”)
Answer Press Further (top)
Present Flour Covered Robe, NEW (“I was wearing the robe…”)
Cross Examination: What Happened on the Top Floor
Present Pendant, 3 (“As I struggled…”)
Present Pendant, 2 (“They attacked me from behind…”)
Grimoire Fainfol, NEW (“I heard the incantation…”)
Answer Something other than magic (Middle)
Present Darklaw
Answer Darklaw herself (Middle)
Magnify Darklaw’s neck
Cutscene
Save Prompt
Cross Examination: What Happened Tonight
Press 3 (“I had my own reasons”)
Question Kira
Answer There’s something odd (bottom)
Present Invisible Robe, 4 (“I climbed the stairs”)
Press 2 (“As I passed by the bell tower”)
Answer There’s something very wrong (Bottom)
Present Footprints Sketch, NEW (“There was no heel”)
Present Footprints Sketch
Cross Examination: Shades
Press ALL
Press NEW (“There is… but one true purpose”)
Answer I’m prepared, Your Honour! (Top)
Grimoire ANY SPELL
Present Testimony 2
Present Storyteller
Answer She tried to betray the Storyteller (Middle)
Save Prompt
Epilogue: The First Story
Cross Examination: The Truth about Labyrinthia
Press ALL
Present Espella
Cross Examination: The Legendary Fire
Press 4 (“An enormous fire dragon appeared …”)
Question Storyteller
Press 3 (“The Great Witch Bezella …”)
Question Storyteller
Answer I have evidence (Top)
Present Fire Dragon Sketch
Answer It’s the town itself (Bottom)
Scroll left twice
Examine bottom rail
Present Picture of Two Girls
Present Darklaw
Present Pendant
Present Bell of Ruin
Save Prompt
Chat
Present First Story
Present Suicide Note
Cutscene
Cross Examination: The Truth about the Legendary Fire
Press 5 (“All strenght abandoned us…”)
Question Storyteller
Press 4 (“I was shaking her until …”)
Question Espella
Present Top Floor Device
Present Darklaw
Cutscene
Unskippable Cutscene
Unskippable Cutscene
Puzzle 70
Notes:
- Characters are matched from top to bottom, left to right


Cutscene
Not Guilty!
Chat
Time ends on "The Last Witch Trial was drawn to a close"
Credits
- Images used in this guide by Professor Layton Walkthroughs
- Ace Attorney Speedrunning guide notation by indykenobi, adapted for PLvsAA by ikuyo
- Original PLvsAA route by Kurayami
- Proofreading by Layton Speedruns Community
- Route and guide by ikuyo and tutelarfiber7